Friday, July 27, 2018

Candy Machine Shaker Favor Cards: DT project for White Rose Crafts

Good afternoon! I've got a set of Candy Machine Shaker Favor Cards to share with you today that I created as my design team project for White Rose Crafts.


I started with a pack of Jillibean Soup Small Circle Shaker Cards and matching Shaker Pouches, the Jillibean Soup Sweet Treat stamp set & a selection of Distress Oxide Inks in Candied AppleWilted VioletSalty OceanSpiced MarmaladePicked Raspberry & Mowed Lawn. I stamped the candy machine base and top around the shaker card openings in each of the Oxide colors. You'll notice how I never show the card I created in Candied Apple again...well, that's because I smudged it beyond recognition right after I took the next photo. Oops. We won't dwell on that now. Sigh.


Next I colored in parts of the candy machine base images using my Kelly Creates Metallic Jewel Brush Pens, to give them a little shine. I stamped the "Sweet Treat For You!" sentiment using Versafine Clair Medieval Blue ink. Clair inks have been my favorite for sentiments lately because, being a pigment ink, they produce beautiful, crisp impressions every time, even with acrylic stamps (like those from  Jillibean Soup), and they dry much faster than other pigment inks. 


Next, I selected some geometric and plaid patterned papers that I thought coordinated well with the images & cut out 2 panels of each, measuring 4x5.25 inches, plus a strip measuring .5-.75x3.75 inches. I adhered the skinny strips beneath the candy machines, to ground them. Then I adhered one the 4x5.25 inch panels, centered inside each of the cards, and layered them with a panel of white cardstock, measuring 3.5x4.75 inches. I took the second panel of coordinating patterned paper and temporarily adhered it to the back of the cover of my card using washi tape. I lightly traced my shaker opening with a pencil & removed the paper from my card. Next I used a Tear Strip die from my stash and some partial die cutting to cut a short tear strip on each of the panels inside the pencil circle. 


I added double sided tape to the patterned side of the paper, being careful to avoid my pencil circle. Once my tape was applied I erased my pencil circles. Then, I took the Jillibean Soup Small Circle PVC Shakers and popped them through the shaker card openings & filled them with chocolate candies, before adhering my patterned panels of paper to the back, securing the shaker pouch and candy in place, and making sure the tear strip was behind the pouch so my recipient has easy access to their sweet treat!


I hope you enjoyed these cards. You'll notice I promptly forgot to take any more process photos after the first one (that I smudged the card), because I got frustrated--but I'll try to do better next time.

Additional Supplies:


~~~~~~~~~~~~~~~

Thanks for visiting the blog!
Come back soon,
Happy Crafting!

Tuesday, July 24, 2018

Kindred Stamps July Release Blog Hop

Hello there! I am thrilled to be participating in my very first Kindred Stamps release Blog Hop! If you found your way here from DaggDesigns Blog, you are in the right place, If you haven't checked out the rest of the hop yet, you can find the complete blog list at the end of this post--or, if you'd like to start at the beginning, Hop on over to Kindred Stamps!

I had the pleasure of working with the brand new Catcher of Beasts stamp set, and it was a blast! They're such cute images and turned out SO fabulous, all colored up! I loved coloring them so much, I did 3 sets--so you can expect more projects featuring these mystical characters in the future! 

I've created three cards to share with you today, and I hope you like them! 
Without further adieu...

~~~~~~~~~~~~~~~~~

As soon as I received this set in my DT package, I absolutely knew this card had to happen! I've had the Tim Holtz Sizzix Cityscape Skyline dies in my stash for the longest time and really never found a use for them--well, now I know why I purchased them! It was in anticipation of making this card!!

I started by cutting a light grey panel using the largest of the Gina Marie Designs Double Stitched Inside and Out Rectangle die set. Next I cut the road with a die set from my stash, using white cardstock for the bottom layer and black for the top. I selected a variety of shades of cardstock in blues, greys and black from my scrap stash, and cut out a bunch of the Cityscape Skyline borders. Next, I sorted them from lightest to darkest and adhered them, layering one a bit higher than the other--alternating greys and blues to give the design depth. I added the road to the bottom, and then adhered the whole thing to my grey panel--trimming the excess with my Fiskars non-stick scissors


I cut a sun with a small stitched circle die from my stash, and adhered it, tucked behind the horizon line.  I stamped the "You're Fantastic!" sentiment, from Catcher of Beasts in the top right corner using Versafine Onyx Black ink, before adhering the whole panel to the front of a medium grey, top folding, A2 card base. Finally, I added the colored characters to the road, and tucked the little twig dude behind some of the buildings in the cityscape, just for fun! I left the inside of this one blank for now, because I'm not sure what I'll use it for, yet!


~~~~~~~~~~~~~~~~~

For my second card, I decided to do something a little bit interactive. I selected some kraft cardstock from my stash and cut  3 panels using the 3rd die in the Gina Marie Designs Double Stitched Inside and Out Rectangle die set. Then I used the middle size of the Lawn Fawn Lift the Flap die set to cut cabinet "doors" in two of the panels, with the notches facing each other. I used Ground Espresso Distress Ink to ink the edges of the cabinet doors and panel edge, to give them some definition. I adhered the first of these panels to the bottom of an aqua, top folding, A2 card base. Next I cut a strip of off-white cardstock and adhered it at the top, so it looked like a counter. 


For the upper cabinet, I cut a thin strip of kraft cardstock, inked the top edge and adhered it to the center of the uncut, landscape, panel. Next, I adhered the second panel with the cut doors to the top, only using glue around the very edges and center bar of the panel, so my doors can open and close freely. I adhered the assembled panel to the top of the panel, leaving space between the cabinets. I stamped the "I think you're nifty!" sentiment, just below the top cabinet using Versafine Onyx Black ink. I did some stamp surgery and cut apart the "You're a Magical Creature" sentiment so I could stack it, and stamped it inside the right cabinet door with Onyx Black ink. I adhered the little stick dude, peeking out of the left door and adhered the other critter on the shelf in the cabinet.


I decided to finish the inside of my card in a simple way by stamping the "You stole my heart" sentiment in Onyx Black ink in the center of the top third of the panel and added another of the little thief critters--with watch chain trimmed off--sitting on the word "stole". 


~~~~~~~~~~~~~~~~~

For my third and final card, I wanted to go a little more simple with this card, so I selected a sheet of the Lawn Fawn Let's Polka in the Meadow paper collection and three shades of pink cardstock. I cut the striped Lawn Fawn paper using the largest of the Gina Marie Designs Double Stitched Inside and Out Rectangle dies. I then cut the 2nd, 3rd and 4th dies in a set of Stitched Scalloped Heart dies from my stash from the three shades of pink cardstock. I adhered the largest of the pink hearts to the front of the striped panel and trimmed off the excess. I stamped the "I think you're nifty! sentiment, centered above the heart, in Onyx Black ink, before adhering the other two heart layers on top of the first, using Woodware 1mm foam mounting tape, for just a tiny bit of dimension. I adhered my colored characters with Multi Medium Matte


I again kept it simple on the inside, creating a custom sentiment from the Catcher of Beasts stamp set by doing a bit more stamp surgery to separate "You" from the "You stole my heart" sentiment and combining it with "Magical Creature" from the "You're a magical creature" sentiment and adhered another of those adorable little stick dudes next to it. 


~~~~~~~~~~~~~~~~~

The Kindred Stamps team, myself included, hope that you've enjoyed reading about my card makes for this release. If you would like an opportunity to win shop credit please go and comment on everyone's blog post! One random winner will win a $10 shop credit, they will be contacted privately and announced in our Fan Club, Kindred Stamps Fan Club!

Kindred Stamps
Guest Designer Kim Huffman
Tinkerin in Ink

Your next stop is R Winn Creates
Don't forget to leave comments along the way!

~~~~~~~~~~~~~~~

Thanks for visiting the blog!
Come back soon,
Happy Crafting!

Guest Post by Designing Diva: Alison Heikkilla - Pizza You

Pizza You
By Alison Heikkila

Hello! It's Alison again and I'm back with not only a new shaker card featuring another fabulous Sparkle Blend from Doodles Paper Playground, but the card also has new stamps from Beth Duff Designs. My card today uses the adorable pizza image and coordinating sentiment. I thought this was perfect to use with the "But First, Coffee" Sparkle Blend.


Check out the beautiful chocolate browns of this particular Sparkle Blend, along with some lovely iridescence. I thought it mimicked toppings on a pizza nicely.


I used a leftover die cut from Lawn Fawn to make the shaker, and it was the perfect size. This die is from the Magic Color Slider set. My background was done with the Small Cathedral Windows stencil and VersaColor ink in White. I also spritzed on Tuxedo Black and Desert Sand Fireworks! Spray, and I finished off the edge of the card base with Champagne Delicata ink.


I think this card came out really cute, and now I really want a slice of pizza. And a cup of coffee. But that's not unusual! Thanks for stopping by. I'll be back soon with a new project. Have an inspiring day!

~~~~~~~~~~~~~~~~

Thanks for visiting the blog!
Come back soon,
Happy Crafting!

Saturday, July 21, 2018

Guest Post by Designing Diva: Alison Heikkila - Intergalactic Hi

Intergalactic Hi
By Alison Heikilla

Greetings everyone! Alison here. Today I have a new shaker card featuring the Intergalactic Sparkle Blend from Doodles Paper Playground.


In my never-ending attempt to make shaker cards in different ways, this time I used letter dies from Quik Kutz. Are they even a company any more? Anyway, I had this cool, outer-space looking alcohol ink background that I had made a while back on glossy photo paper, and I thought it would go really well with the Intergalactic Sparkle Blend. This blend has lots of stars and bold, bright colors plus black and silver. It is a gorgeous mix of shapes and sizes and it's become a favorite of mine.


I tried to highlight the letters a bit with a white Molotow pen, but the nib on the pen is shot, so it was't working right. I scraped away some of the white but I couldn't get it all up. The jury is still out on whether or not I like the white the way it is. I probably should have just left it alone. But look at those pretty sparklies!!!


I felt as though the card needed a little something else, so I die cut a few vellum stars and added them towards the top left corner. I added a few sequins to them to help hide my glue and add some additional shine. The stars are really subtle, but just what the card needed. I put the shaker on a gray card base, which I think is so pretty.


This card is a quick one to make, as I usually have a bunch of backgrounds on hand. So it's just a matter of making the shaker and adding embellishments. Be sure to visit White Rose Crafts LLC to see the Intergalactic Sparkle Blend as well as all of the other options. They are all limited edition, so be sure to grab what you love when you see it! Thanks so much for stopping by. Have an inspiring day!

~~~~~~~~~~~~~~~~

Thanks for visiting the blog!
Come back soon,
Happy Crafting!

Four Kaisercraft Fairy Dust Collection Shaker Cards, created for White Rose Crafts Design Team

4 Kaisercraft Fairy Dust Collection Shaker Cards

Today I would like to share four cards I created as part of my design team projects for White Rose Crafts using the beautiful Kaisercraft Fairy Dust paper collection, combined with three of my June Release Sparkle Blends

All of our limited edition Sparkle Blends are available for purchase, exclusively, in the White Rose Crafts online store, while supplies last.

~~~~~~~~~~~~~~~

For my First project, I chose a 4x6 panel from the Stardust cut apart sheet. I used my kraft knife to cut out the center of the oval design, mounting it in the center of a landscape, white A2 card. I cut a piece of acetate transparency and mounted it on the back of the frame panel. I selected the Lilac Luster Sparkle Blends and placed a generous amount to the center of the decorative oval & used 3mm Woodware Mounting Tape to pop up the panel & attach it to my card base. For a final touch, I cut out one of the sentiment banners and fussy cut a butterfly from the foiled Flutter cardstock and adhered them in opposite corners, before adding some Dovecraft Crystal Glitter Glue. On the inside, I trimmed down one of the cut apart sentiments from the Fairy Wishes cut apart sheet.


On the inside, I trimmed down one of the cut apart sentiments from the Fairy Wishes cut apart sheet.


~~~~~~~~~~~~~~~

For my second card, I selected another of the sentiment panels from the Fairy Wishes cut apart sheet, and used my craft knife to cut out the bracket panel in the center, carefully cutting around the fairy image. I mounted a 4 7/8x4 7/8 panel of the reverse side of the Sparkly paper, and placed a generous amount of Fairy Dust sparkle blends in the center. I added acetate to the back of my front panel and popped it up using 3mm foam tape. I cut out and mounted a sentiment banner, and one of the flowers from the Enchanted paper and mounted them using 1mm foam tape. 


On the inside, I added a panel of white cardstock, and cut apart the sentiment I'd cut out of the center of the panel on the front. Finally, I added a fairy I fussy cut from the foiled Flutter cardstock and mounted it on the left of the sentiment to cover up the notches where the fairy had been cut out.


~~~~~~~~~~~~~~~

For my third card, I chose another of the panels from the Fairy Wishes cut apart sheet & fussy cut the bracket portion. I used my kraft knife to cut out the center rectangle with the fairy image, and mounted it on the center of a top folding, landscape A2 card base. I placed a generous amount of Peacock Pizzazz Sparkle Blends in the center of the panel. Then I adhered a panel of acetate to the back of the frame and mounted it over the sequins with 3mm foam tape. I cut one of the banner strips from the edge of the paper, mounted it on purple cardstock and adhered it to the bottom of the shaker, using 1mm foam tape. I fussy cut 4 butterflies and adhered them in the corners, with their wings popped up. Finally, I added glitter glue for sparkle.


On the inside, I cut apart another of the sentiment banners from the barcode edge of a sheet of paper, trimming it into three lines, short enough to fit inside the card, and mounted them on a scrap of the patterned paper and then a piece of teal cardstock. I mounted that whole thing on a panel of lavender cardstock, edged at the top and bottom with thin scraps of another pattern. I added the whole panel to the inside of my card and embellished it with more fussy cut butterflies.


~~~~~~~~~~~~~~~

For my final card of the day, I selected one more of the panels from the  Fairy Wishes cut apart sheet and fussy cut the scalloped circle. I used a circle die from my stash to cut out the sentiment in the middle, and set it aside. I cut a 5.25 inch square panel of the Flutterby paper and adhered it to a pale aqua 5.5 inch card base. I added a circle of acetate to the back of the scalloped frame, and used a double layer of Fun Foam to create my shaker box, using two dies from my stash. I added a generous amount of the Fairy Dust Sparkle Blends to the center of the panel, and added my frame. I trimmed down one of the sentiments from the bar code edge of the paper and adhered it at the top of the shaker. Above that, I adhered a crown image, fussy cut from the foiled Flutter paper, as well as a few butterflies and one of the fairies. I added Glitter Glue to the fairy and butterfly wings, and used Sea Breeze Nuvo Jewel Drops on the crown as jewels.


To finish the inside of my card, I took the center I had cut out of the frame I used for the shaker and adhered one of the fussy cut crowns to the top, and a little butterfly as embellishments.


~~~~~~~~~~~~~~~

I hope you've enjoyed my cards today. You can check out the rest of the cards I created with this paper collection over on the White Rose Crafts Blog!

~~~~~~~~~~~~~~~

Thanks for visiting the blog!
Come back soon,
Happy Crafting!

Sunday, July 15, 2018

Guest Post by Designing Diva: Cheryl Schoeman - Mermaid birthday wishes

Mermaid Birthday Wishes
Cards and Clutter
Using Doodles Paper Playground: Sparkle Blends - Mermaid Scales

Hi everybody, Cheryl taking over the Doodle blog again today! 😊 Last time I posted, I had a princess birthday card for my daughter, Paige. This time, I have a birthday card for my other daughter, McKenna (they are twins).


So originally I wasn't sure if I was going to do another shaker card but my husband saw the princess one and told me I couldn't not make a second one, lol. The girls are both in love with Ariel from The Little Mermaid which made my coloring choices pretty easy.

To start my card, I stamped the little mermaid on bristol smooth cardstock and then masked her with a post it note. Then I used a stencil and two colors of blue to make the background behind her. I colored her with zig clean color markers and a bit of water. The sentiment was stamped with black ink several times using my misti tool. Note to self: let the distress oxide inks dry completely before trying to stamp on top.

For the shaker portion, I used turquoise cardstock and die cut the center portion out. Then I adhered acetate to the inside and layered foam tape along the edges. To assemble, I added the sparkle blend on top of the mermaid and laid the window panel over it. The shells along the edges were stamped with the same distress oxide inks that were used for the background.


Such a pretty blend! Can you see the little fishes and ducky?

~~~~~~~~~~~~~~~

Supplies:
Stamps: YNS - Little darling mermaid
Dies: MFT - Mod rectangle stax
Inks: Zig clean color markers; Distress Oxide inks - Peacock feathers,Salty Ocean
Stencil: Altenew - Scallop builder
Embellishments: Doodles Paper Playground - Mermaid scales

~~~~~~~~~~~~~~~

Thanks for visiting the blog!
Come back soon,
Happy Crafting!

Friday, July 13, 2018

A Very Wild Rose Christmas in July: DT project for White Rose Crafts

Hello Doodle friends, its time for some Wild Rose Studio inspiration!  I decided to get a jump start on my Christmas cards, with a little Christmas in July, WRS style and created using some adorable stamps and pretty Christmas papers from Wild Rose Studio


For my first card, I chose the Snowman Family stamp set and a sheet of pretty snowflake paper in non-traditional colors from the Frosted Lace paper pack. I stamped the images with Versafine Onyx Black ink on Bristol Smooth cardstock and colored them with a combination of Arteza real brush pens and Distress Markers.


For my second card, I selected the Christmas Bunny stamp and a beautiful poinsettia printed paper from the gorgeous Festive Florals paper pack. I colored this cute little guy with Arteza real brush pens and embellished my card with Nuvo drops in Red Berry and Dovecraft Crystal glitter glue.


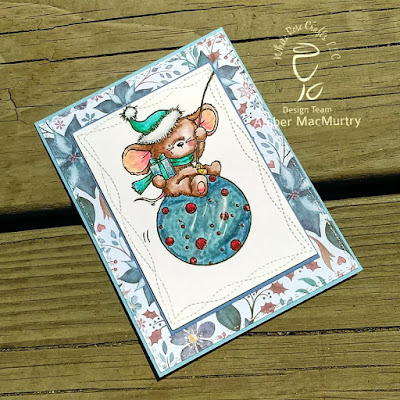
For my final card, I had to use the squeal worthy Mouse on Bauble stamp on a sheet of stunning blue poinsettia paper, also from the Festive Florals paper pack. 


I hope you enjoyed my cards today as much as I loved making them! I adore these products, so so much!

~~~~~~~~~~~~~~~

Thanks for visiting the blog!
Come back soon,
Happy Crafting!

First Design Team Project for Kindred Stamps - Kraken Meal Plan, Mystery Revealed Card

Kraken Meal Plan, Mystery Revealed Card

I am absolutely thrilled to share my first project for the Summer Term Kindred Stamps Design Team! I am so excited to have the opportunity to work with such a talented group of women, representing such a unique and fantastic brand. I'll be sharing lots of inspiration over the next 3 months, so be sure to follow my blog!

~~~~~~~~~~~~~~~

I finally got my hands on the amazing Lawn Fawn Reveal Wheel die set and knew it was a perfect match for Kindred Stamp's Mythical Kraken stamp set!! I've had this idea in my head since my Design Team package arrived! I started by cutting all of my necessary pieces out of 110# white cardstock, using the die set, and set them aside. Then, I cut a front panel out of vellum and used Peacock Feathers, Broken China, Salty Ocean & Blueprint Sketch Distress Oxide inks to blend onto the back side, for a watery ombre background, setting it aside to dry.


Next, I took the wheel part of my reveal wheel, divided it into quarters with a light pencil line & took the small, supporting images from the stamp set, stamping one in each quarter. I should have traced my reveal opening to make sure they were in the right place, but I didn't--luckily I got them placed pretty close to in the right place--whew! I also stamped the main, Kraken image on a scrap of 65# white cardstock & I colored the images, and the background of my wheel, using Copic Markers.


I assembled my wheel, following the directions in this Lawn Fawn video, and before attaching the front panel, I used a wave die from my stash to cut down the vellum, and adhered it to the front panel using glue dots. Next, I stamped the "What do sea monsters eat for dinner?" sentiment above my reveal window in Blueprint Sketch ink & added the detail frame included in the die set, trimming the waves with a kraft knife. I adhered my Kraken to the ocean panel and added details and bubbles with my white Sakura Gelly Roll pen and mounted the whole panel on an ice blue, 120# card base.


I knew I had to bring the outside to the inside of this card, and cut a panel using the second largest of the Gina Marie Designs Limited Edition Double Stitched In and Out Cut Rectangle die set out of 110# white cardstock and inked the edges with Salty Ocean Oxide Ink. I put the panel in my Misti and stamped the fish, ship and anchor images in Versafine Clair Morning Mist ink in the top left corner. I rotated the panel 180 degrees and then stamped it again. I stamped the punchline sentiment, "fish & ships" using Blueprint Sketch ink, and added a touch of color to the images with Copic markers. I adhered the panel inside my card, signed the back and called it complete!


I hope you've enjoyed seeing my first Kindred Stamps project! I had a blast working with Mythical Kraken and can't wait to create more inspiration projects for you!

~~~~~~~~~~~~~~~~

Thanks for visiting the the blog!
Come back soon,
Happy Crafting!