Showing posts with label Sequins. Show all posts

Wednesday, June 2, 2021

Scootin' By To Say. . .

 Scootin' By To Say. . . 


☆☆☆☆☆☆☆☆☆☆☆☆


I started with die cutting my top panel and stamping the sentiment.


I stamped these images from Lawn Fawn Scootin' By stamp set.
I colored them with copic markers and die cut them out.


I assembled my images on the card front,
I used winks of Stella on the dirt cloud and balloons, 
and a black glaze pen on the wheels.


I used foam tape and closed in my sequins with a second layer of acetate.
I chose a pink speckled background for the shaker window.


Then I added sequins to the front to finish the card. 
I used the new Sparkle stick to place these sequins. 
That stick is amazing!!
I usually use tweezers and end up with sequins flying all over my desk!
This stick made them so easy to pick up and and released great also!!

☆☆☆☆☆☆☆☆☆☆☆☆


For this card I used the Subtle Rainbow Sparkle Blend 
that will be part of the June release, Available on June 4th.

It really is a great subtle rainbow mix and I love the little rainbows!

☆☆☆☆☆☆☆☆☆☆☆☆

There are more great Sparkle Blends over at the 

You can use my code FAWN10 for 10% off your order.

There is also a Facebook group where you can share 
creations you have made with Sparkle Blends!
Come check it out, share some inspiration!


Thank you so much for stopping by!
Now, Get Out There and Create Something Amazing!!


☆ Facebook ☆ Instagram ☆

Wednesday, April 7, 2021

Sequin Fridge Magnets - April Release

 April Release


☆☆☆☆☆☆☆☆☆☆☆☆

I just love making these sequin magnets.


I start by adding alcohol ink to the ceramic tiles.
I spray it with a clear coat so that 
the ink does not run when I had the mod podge.


For this one I used the Gummy Bear Sparkle Blend.
I went with a light green background.


I applied the Mod Podge and added the sequins.
That is it.
Once it dries, I add a magnet to the back 
and it is ready to be displayed!!


The large gummy bear from this blend is great on this magnet!
I also love the great colors in this blend.

☆☆☆☆☆☆☆☆☆☆☆☆

There are more great Sparkle Blends over at the 

You can use my code FAWN10 for 10% off your order.

There is also a Facebook group where you can share 
creations you have made with Sparkle Blends!
Come check it out, share some inspiration!


Thank you so much for stopping by!
Now, Get Out There and Create Something Amazing!!


☆ Facebook ☆ Instagram ☆

Thursday, February 4, 2021

Shamrock Bling

Do you have your Shamrocks polished and your drinking mugs ready, because St. Patrick's Day is just around the corner. Today I am celebrating the luck of the Irish was a card decked out in in full Shamrock Bling, or at least the Sparkle Blend variety.

I started by stamping a La-La Land Crafts Mad Hatter image in alcohol friendly ink.

Using a variety of Green copic inks, I colored up the hatter image to make it look more Irish.

I finished off the image using hints of gold and grey copics and trying to give him some fun Irish red hair.

Using a rectangle die, I die cut the image on all sides but the bottom.

Using an utility knife I trimmed around the edges of the image so the now Irishman could be attached to the base.

Using some distress oxides, I blended a background to go behind the Irishman. I used a huge variety of colors starting with Scattered Straw in the middle and blending out with Twisted Citron, Mowed Lawn, Lucky Charm and Rusty Wilderness. I alway splashed the whole background with Nuvo Mica Mist in Fresh Pear. I know this is a wide range of colors, but I pulled them from the Shamrock Sparkle Blend pack.

I added three dimensional tape to the background, filling the middle of the image with extra tape to make sure the sequins are always seen.

This is what the Irishman looks like with the sequins and background added.

I love the little bit of edging left when the sparkle blend is added to an A2 Card frame.

Let me know in the comments below if you think I was able to turn the hatter into a fine Irishman. Until then, happy crafting.

Tuesday, January 26, 2021

Love Letters

Hey Everyone!  It's EK and today I am playing around with one of the recently released Doodles Paper Playground Sparkle Blend today to make a masculine Valentine's Day Card.

I started by covering a piece of watercolor paper with Candy Apple, Fired Brick and Black Soot Distress Oxides.

I sprayed an splattered the cardstock with some silver shimmer spray and let dry.

I trimmed up the cardstock and die cut the center of the card with a The Art of Paper die.

I prepared the cardstock to become a shaker card and filled it with the Love Letters Sparkle Blend mix. I stamped on the background of the A2 card frame some falling hearts from a Neat and Tangle stamp and assembled the card. I also added a sentiment to the card frame from Concord and Ninth.

To finish the card I added a few extra sequins around the sentiment and called the card done.

I really like the masculine feel of this card and the almost space feel of the background.

Make sure you pop over and check out all of the new Doodles Paper Playground's Sparkle Blends. Until then, happy crafting.

Oh, and if you want to save 10% on your order feel free to use the code EKGORMAN10

Friday, January 22, 2021

Giant Sequin Rainbow


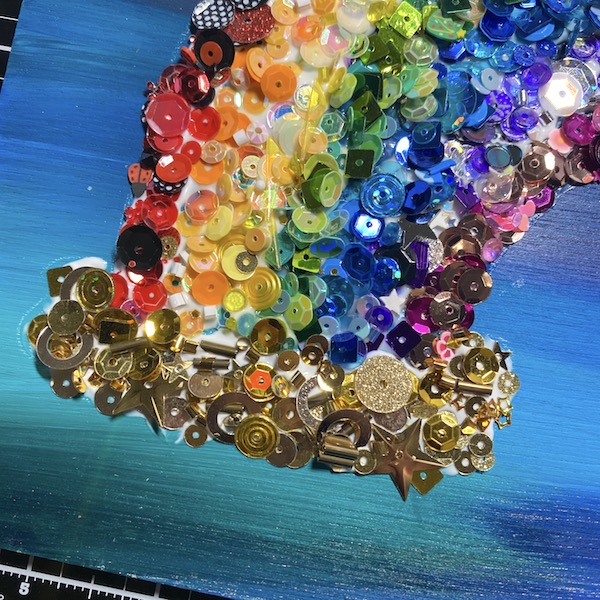
Hey everyone!  It's EK.  Did you know that little girls like rainbows? I mean really like rainbows...and they don't have to be so little to love them. Today I am finally placating my 12 year old daughter and creating this giant (and yes I mean 8x10 giant) rainbow on wood panel for my rainbow obsessed kiddo.

To create this giant rainbow, I pulled seven (plus one) packages of Sparkle Blends sequins from Doodle's Paper Playground.

Now I will warn you, I tried to cut a corner on this project, so it didn't turn out how I had hoped or planned, but my kid loves it and I thought it was still worth sharing despite my personal disappointment in it.

I started with an old already painted wood panel. This was painted up for another project that I just never got around to. But I really thought all of these blues and teals would make the perfect background for a rainbow.

Using a water soluble white pencil, I sketched a rainbow onto the panel.

Using some craft glue, I added the 'violet layer' using the Rosey Gold Sparkle Blend.

The 'indigo' layer got a layer of With A Bang Sparkle Blends.

For the 'blue' section, I added Baby Shark Sparkle Blends, and Oh Christmas Tree for the 'green' section.

I pulled out the Birthstone Collection Citrine Sparkle Blends for the 'yellow' row and Candy Corn for the 'orange'.

Finally I adhered Ladybird Sparkle Blends for the 'red' row.

At the bottom of each rainbow I added a rainbow I sketched in a cloud using my water soluble pencil.

I filled the clouds with Gold Rush Sparkle Blends.

Here is where I messed my project up. Instead of using Golden Clear Tar to coat the sequins, a product that would have dried clear and shinny, I used some Liquitex Matte Medium. I used it all the time on art journals and mixed media projects and it always dries clear. However, I don't used it this thickly, and come to find out when it is thick, it dries cloudy.

Despite the cloudiness, I still think there is something really special about this project. And more importantly, my rainbow loving 12 year old things it is perfect.

White the project may not be perfect, I hope it makes you think about using your sequins in unique ways.

Oh, and if you want to save 10% on your order feel free to use the code EKGORMAN10