Showing posts with label cheryl. Show all posts

Sunday, July 15, 2018

Guest Post by Designing Diva: Cheryl Schoeman - Mermaid birthday wishes

Mermaid Birthday Wishes
Cards and Clutter
Using Doodles Paper Playground: Sparkle Blends - Mermaid Scales

Hi everybody, Cheryl taking over the Doodle blog again today! 😊 Last time I posted, I had a princess birthday card for my daughter, Paige. This time, I have a birthday card for my other daughter, McKenna (they are twins).


So originally I wasn't sure if I was going to do another shaker card but my husband saw the princess one and told me I couldn't not make a second one, lol. The girls are both in love with Ariel from The Little Mermaid which made my coloring choices pretty easy.

To start my card, I stamped the little mermaid on bristol smooth cardstock and then masked her with a post it note. Then I used a stencil and two colors of blue to make the background behind her. I colored her with zig clean color markers and a bit of water. The sentiment was stamped with black ink several times using my misti tool. Note to self: let the distress oxide inks dry completely before trying to stamp on top.

For the shaker portion, I used turquoise cardstock and die cut the center portion out. Then I adhered acetate to the inside and layered foam tape along the edges. To assemble, I added the sparkle blend on top of the mermaid and laid the window panel over it. The shells along the edges were stamped with the same distress oxide inks that were used for the background.


Such a pretty blend! Can you see the little fishes and ducky?

~~~~~~~~~~~~~~~

Supplies:
Stamps: YNS - Little darling mermaid
Dies: MFT - Mod rectangle stax
Inks: Zig clean color markers; Distress Oxide inks - Peacock feathers,Salty Ocean
Stencil: Altenew - Scallop builder
Embellishments: Doodles Paper Playground - Mermaid scales

~~~~~~~~~~~~~~~

Thanks for visiting the blog!
Come back soon,
Happy Crafting!

Tuesday, July 10, 2018

Guest Post by Designing Diva: Cheryl Schoeman - Happy birthday, Princess

Happy Birthday, Princess
Using Doodles Paper Playground: Sparkle Blends Lilac Luster

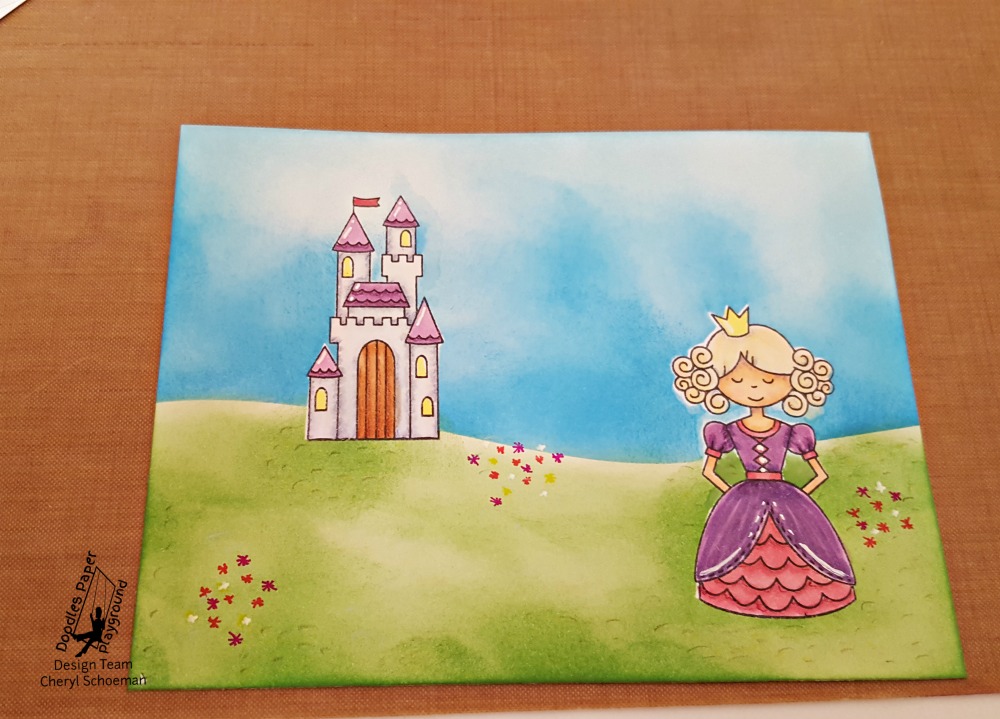
Hi everyone! I have a quick tutorial making a royal card using Lilac Luster Sparkle Blends from Doodles Paper Playground.


This card was completely inspired by my 4 year old daughter, Paige. She is in love with purple and princesses ♥ I started my card with the background and stamped the castle and princess on a panel of white cardstock. I then colored them with copics.


To color in the rest of the background, I fussy cut the castle and princess with masking paper and cover them up. Then I took a scrap piece of masking tape that was already curved and laid it down over the bottom of the castle and part of the princess. It didn't actually cover the whole panel but I just moved it over when I got to the little area on the right.


I started blending the sky using a light blue along the upper half and a slightly darker blue along the horizon and behind my masked areas. Once the sky was done, I realized my masking tape had lost most of its stickiness. Rather than cutting a new piece, I attempted to blend the green along the bottom without it. Luckily, I liked having a slightly lighter color along the upper portion of the grass and where I did go into the sky, the darker blue covered up my mistake. As I took off the masking paper, there was a portion behind the princess' arms that were still white. To add color, I smooshed ink on my desk and used a water brush to add color.


I added some flower details with colored felt tip pens and highlights with a white gel pen.


I stamped the sentiment and a few hearts in the sky to finish the background. To assemble my shaker, I added the sparkle blend to the middle of the colored panel. Then cut a frame out of purple cardstock, added acetate to the back and then foam tape on top.


The frame was adhered to the top of the background. I used runner tape to add the shaker panel to the front of a side folding A2 card. I completed my card by adding little white flowers/stars with my white gel pen.


I hope Paige-y likes it. Now I have to make another one for her twin sister. That one may involve a mermaid instead :)

Supplies:
Stamps: Newton's Nook - Once upon a princess
Dies: MFT - Mod rectangle stax
Ink: Distress ink - Salty ocean, Tumbled glass, Mowed lawn; MFT - Black licorice;
Copics; Staedtler Triplus Fineliner pens 

~~~~~~~~~~~~~~~

Thanks for visiting the blog!
Come back soon,
Happy Crafting!

Monday, July 2, 2018

Guest Post by Designing Diva: Cheryl Schoeman - Hello Pizzazz

Hello Pizzazz
Using Doodles Paper Playground: Sparkle Blends Peacock Pizzazz

Hi everyone! Cheryl here & I am glad to be back as a guest on the Doodles Paper Playground blog. Today I have an ocean card inspired by the Sparkle Blends, Peacock Pizzazz.


To start my card, I masked off the top portion of a panel of Bristol smooth cardstock on an angle and used a light blue ink blended over the bottom. Then I used washi tape to secure a wave stencil on top and used two darker blue inks over it.


I die cut a rectangle out of white cardstock and stamped the shark and sentiment on it. I colored the shark with copics.


I added the panel to a top folding A2 card and layered the shark on top. Then I used embellishments from Peacock Pizzazz and added them to the stenciled waves and as bubbles above the shark.


~~~~~~~~~~~~~~~

Supplies:
Copic –C00, C1, C3

~~~~~~~~~~~~~~~

Thanks for visiting the blog!
Come back soon,
Happy Crafting!

Saturday, June 9, 2018

Guest Post by Designing Diva: Cheryl Schoeman - Sweet Hello

Sweet Hello
Using Doodles Paper Playground: Sparkle Blends Sweet Treats

Hi all! I have a card using the new Doodles Paper Playground sparkle blend Sweet Treats. This blend reminds me of ice cream trucks and all things summer so I made a sunny card with it.


I started by using alcohol inks mixed together for the background and cut it down to a 4 x 5.25 inches. I am still working on my technique with alcohol inks. The colors I used were really pretty even before I used the mixative. I think next time, I am going to try just laying the colors down and letting them spread as is. It will leave some white space but it looked neat.

Then I die cut the front panel out of white cardstock and blended a sunny yellow on the top. To put the shaker together, I adhered the acetate to the back of the front panel and added foam tape on top of it. I removed the release paper before adding the blend. I found that I make more of a mess when I remove the release paper after the sparkle blend is in place. I lined the background up with the top of the panel and pressed down and added the whole piece to a top folding A2 card.

Supplies
Inks: Alcohol inks – pink sherbet, pool, sunshine yellow, flamingo; Distress oxide inks – Squeezed lemonade
Dies: YNS – Circle Panel Die


This is a really pretty blend. I also may use it with a popsicle die or as embellishments to anything spring/floral. 
More fun as soon as I get free time! 
Thanks so much for stopping by.

~~~~~~~~~~~~~~~

Thanks for visiting the blog!
Come back soon,
Happy Crafting!

Tuesday, May 29, 2018

Guest Post by Designing Diva: Cheryl Schoeman - Bright Flowers

Bright Flowers

~~~~~~~~~~~~~~~~~


Hi everyone! I am back with a new card using Doodle’s Paper Playground’s Well, Yellow There Sparkle Blend.


I started this card by stamping the flowers on white cardstock and then die cutting the centers out of two of them. I colored them with spectrum noir sparkle pens and then adhered acetate to the back. On a top folding A2 card, I blended distress ink where the cut outs would show through.  Then I added foam tape to the back of my cardstock panel, added the sparkle blend and stuck the top folding card on top. The last steps were to stamp the sentiment and add a butterfly and flower sequin (to cover up a mistake ;) ).

~~~~~~~~~~~~~~~

Supplies:
Stamps: W plus 9 – Doodle buds; Concord and 9th – Everyday greetings
Inks: Spectrum Noir Sparkle pens; Distress ink – dried marigold; Versafine – black
 ~~~~~~~~~~~~~~~
Thanks for visiting the blog!
Come back soon,
Happy Crafting!

Tuesday, May 15, 2018

Guest Post By Designing Diva: Cheryl Schoeman - You're A Delight

You're A Delight

Hello! I am back with a project using Doodles Paper Playground's Flamingo Tropic sparkle blend. There are some beautiful pink and green colors in this blend as well as pineapple and flamingo shaped sequins.


I started my card by stamping the pineapple on a side folding A2 card. Then, using my misti, I kept the lower half of the pineapple in place and using it as a guide, I taped the coordinating die in place to a white A2 panel laid on top of my card. After cutting it, I repeated the same process with the top leaf portion so that the colorful stamped area would show through the cutout. I stamped the sentiment on the front of the cut panel.


To put everything together, I adhered a panel of clear acetate to the back of the top panel and then laid foam tape over it. I made sure to have the foam tape cover the thin strip between the bottom and top of the pineapple. On the card base, I piled green sequins to the leaf area and pink sequins to the pineapple. Then I took the backing off the foam tape and laid the top panel in place.


To finish it off, I added a few sequins around the sentiment. 

Supplies:
Stamps: Concord & 9th - pop art pineapple, wreath turnabout
Dies: lawnfawn - plastic flamingo; Mama Elephant - mojito, sunshine, blush; Versafine - black


Thanks so much for taking a look at my card!

~~~~~~~~~~~~~~~~

Thanks for visiting the blog!
Come back soon,
Happy Crafting!
Tuesday, April 24, 2018

Guest Post by Designing Diva, Cheryl Schoeman: Intergalactic Shaker Tags

Intergalactic Shaker Tags
Using Doodles Paper Playground: Sparkle Blends Intergalactic

~~~~~~~~~~~~~~~

Hi everyone. I have a couple of cute tags with an out-of-this-world theme using Doodles Paper Playgrounds Intergalactic sparkle blend. How pretty is this blend!?


I have made a few galaxy backgrounds now but I am still trying to get better at them as I've seen some amazing examples out there. Today's was my favorite so far but I am going to keep practicing :) I started by putting down a few colors of distress oxide inks on watercolor paper and then spraying them with water mixed with perfect pearls. Love the colors but next time I want to cover the cardstock more fully.


Then I used distress oxide black soot to cover sections, then spray with water and heat set it. I did this several times. After I had enough color down, I splattered the cardstock with gold shimmer and white mica watercolor.


I die cut tags out of my galaxy cardstock and white cardstock. Then I adhered the interior of the galaxy to my white cardstock and adhered some circle pouches to the outer tags. I already had a few little space critters colored with copics and die cut out ready to go so I added a little space mouse to the inside of one of my tags.


To create the tags, I used a tape runner along the edge of the interior tag and then put my sparkle blend on the galaxy. Then pressed the top of the tag in place. I added the space dog and kitty to the top. I haven't decided if I am going to use these as tags on presents or as ornaments for my kids. Either way, I left the sentiment off and will write one on the back.


I had so much fun making these little shakers. 


~~~~~~~~~~~~~~~

Thanks for visiting the blog!
Come back soon,
Happy Crafting!

Tuesday, April 10, 2018

Guest Post By Designing Diva, Cheryl Schoeman: Oh Baby Ellie

Oh Baby Ellie
Using Doodles Paper Playground: Sparkle Blends Oh Baby

~~~~~~~~~~~~~~

Hi! I am happy to be back again as a guest designer for Doodles Paper Playground blog :) I made a card using Oh Baby sparkle blends for my son's first grade teacher who is expecting her first child.


I started out my card by stamping little 'Ellie' on the bottom of a panel of white cardstock and colored him with copics. Then I die cut the heart above him. For the backing, I didn't want to use foam tape with a shape like a heart because it is difficult (for me) to get the straight tape around curved shapes without gaps. So instead, I used a piece of foam and die cut two nested hearts that I could add to the back of my panel.


Before adding my foam, I adhered a scrap piece of acetate over the die cut. The foam heart cutout fit around the die cut perfectly. Then I added more pieces of foam to the back of my panel. On a top folding A2 card, I blended some yellow distress ink to the area behind my heart balloon to make it stand out. The sparkle blend went into the heart and the A2 card was adhered on top. I hand drew the balloon string in and die cut the sentiment from another yellow blended scrap. I stamped the script sentiment on top in a light green.


Supplies: 
Stamps: Avery elle - Ellie; Lawn Fawn - big scripty words
Dies: SSS - Nested Hearts; Lawn Fawn - big scripty words 
Inks: Copics - C1, C3, C5; Distress inks - Squeezed Lemonade, Twisted Citron


Thanks so much for joining me!

~~~~~~~~~~~~~~

Thanks for visiting the blog!
Come back soon,
Happy Crafting!

Friday, March 30, 2018

Guest Post By Designing Diva, Cheryl Schoeman: Easter Faux Shaker

Easter Faux Shaker
Using Doodles Paper Playground: Sparkle Blends Pretty In Pink

~~~~~~~~~~~~~~

Hi everyone! I am back with a guest post for Doodles Paper Playground. There is a ton of inspiration in the sparkle blends that Amber puts together and today I used the “Pretty in Pink” blend to inspire my card.


One of the flower sequins in this blend goes from yellow to white to pink to dark pink so I used that color scheme to create this faux Easter shaker card. To start my card, I stamped the little girl image on a scrap piece of white cardstock and colored her with Copics. I then took a panel of white cardstock and die cut the wreath out. After die cutting the wreath, I used thin foam tape to cover a good portion of the empty space and then used my tape runner to add adhesive around the small cutouts. I then took the sparkles blend and started placing the sequins on the adhesive. I tried to make sure that each of the sequins covered some portion of the areas that were cutout.


I knew that I wanted to have a color behind the sparkle blend to make them stand out. I am still loving my alcohol inks, so I took out a yellow and orange color and created a quick background. The yellow also ties into my color scheme that I wanted to keep. I love the bright colors of these inks and since most of it will be hidden I didn’t have to worry too much about covering up all the white space.


I removed the foam tape and added the yellow panel to the back. Then I added my sentiment to the front.


I added the faux shaker to a top folding A2 panel. For the last steps, I added the little girl to the center with the thin foam tape and took a few extra sequins and placed them in a couple of the starbursts. I also used a sparkle pen on the flower around the little girl’s face. Here is a closeup.


Thanks so much for checking out my faux shaker Easter card and thanks to Amber for letting me take over her blog today.  :)

~~~~~~~~~~~~~~

Supplies:
Dies: Lawn Fawn – Easter Party; SSS – Floral sparkle wreath
Inks: MFT – Extreme black Hybrid ink; Alcohol inks – Sunshine Yellow, Sunset; Copics – E000, E11, E15, E53, RV00, RV04, RV09, RV10, RV13, Y11, Y13

Saturday, February 17, 2018

Guest Post by Sparkle Blends Desiging Diva, Cheryl Schoeman: Birthday Alien

Birthday Alien
By Cheryl Schoeman 
Cards and Clutter
Using Doodles Paper Playground: Sparkle Blends "Crown Jewels"


Hi! I am so excited that Amber invited me to be a guest designer for Doodles Paper Playground today. She has put together some beautiful mixes of sequins and embellishments and today I got to play with the Crown Jewels mix for this alien shaker card.