Showing posts with label Phoenix. Show all posts

Friday, February 12, 2021

Phoenix Fire

 Hello! Alison here. Today I am sharing my son Phoenix's latest card. Normally, he writes his own posts, but he's been really busy with school work, so I told him I'd write it for him. But please know, he created this entire card himself. Not only that, the Sparkle Blend he used he also created! Phoenix is on the Doodles Paper Playground Design Team with me and my daughter Rhiannon. This month, Doodles released the Design Team Collection, where each member of the team got to create our own Sparkle Blend. It was such an amazing experience, and we all had a fantastic time seeing our ideas come to life. Phoenix's Sparkle Blend is appropriately called "Phoenix Fire."

Phoenix was of course inspired to make a Blend based on his name, just as Rhiannon did (her Blend, named Moon Child, has already sold out). He was also inspired by the amazing Phoenix Bird die my husband and I bought for him from Hero Arts. He did some soft ink blending on the bird, which I think looks amazing. Phoenix wanted to create a scene (as he so often does on his cards) so he (freehand) cut out mountains and made the shaker and background a sky. He also used a fantastic sentiment from one of my favorite Hero Arts stamp sets, called "Dreams are Made," but it's an older set that is no longer available on the Hero Arts site. It says, "my soul is in the sky." He embossed it with Carnelian embossing powder from Stampendous, and it has a fantastic fiery shine to it.

Phoenix created this Blend with lots of fiery tones and many patterns. Phoenix loves mixing patterns together, and he does a really great job of it. At first glance, you might think it's too many patterns, but combined with the solid sequins, and they types of patterns, it made a beautiful and complex Sparkle Blend.

I love how powerful this card is. The Phoenix bird and the Sparkle Blend really take center stage without overpowering each other. I am so proud of the awesome job he did envisioning this "Phoenix Fire" Sparkle Blend, and how he executed the card. Pretty great for a 14 year old, I'd say. Please be sure to visit the Sparkle Blends Shop on Esty to see the entire Design Team Collection, as well as joining the Sparkle Blends Fan Club on Facebook. Thanks for stopping by. Have an inspiring day! 

Sunday, October 18, 2020

Gingerbread House

Hi, it's Phoenix. Today I am going to show you my Gingerbread House card that uses the new Frosted Gingerbread Sparkle Blend from Doodles Paper Playground. I really like the Lawn Fawn Build A House die set with the Gingerbread Add-On, so I knew I wanted to use it with Frosted Gingerbread.

I started out by die cutting the different pieces of the house with brown cardstock, and the details were done with white cardstock. I used Snap & Peel on the small parts, like the piping, which is a double sided adhesive sheet. This makes it a lot easier to adhere the small things to the house. After that, I glued the Sparkle Blends to the house using On Point Glue from Imagine. One thing that I really like about the Frosted Gingerbread Sparkle Blend is the small peppermints. I used one for my door handle.

Next, I cut out the white snowy hill behind the house and the gray wintry sky for a mat. I glued these two pieces together and then stuck the house on top of it. I thought that the hill needed some additional decorating, so I cut out a sign from brown cardstock, die cut another roof from the Gingerbread Add On set in white, and added it to the sign for snow. I decided to use the Season's Greetings stamp from the Reveal Wheel Holiday Sentiments. The sky was a little plain so I stamped the swirls from the Winter Dragon Lawn Fawn set with Pumice Stone Distress Ink.

I didn't use a lot of the parts of the Sparkle Blend, but it has really cute Gingerbread Men and frosted cupcakes. I decided to keep my house a little simple though, so I only used some of the plain brown sequins. I hope you like this card. Have you seen the entire new release of Sparkle Blends yet? Head over to the Sparkle Blends Shop on Etsy to check them out. Have a nice day!


Sunday, August 9, 2020

May Your Day be Filled with Adventure

 Hi, it's Phoenix. Today I am showing you my Interactive dragon card that uses the Pizza Party Sparkle Blend from Doodles Paper Playground. One thing that I like a lot about this card, is that even though I used a Sparkle Blend that has a lot of reds and browns, I was able to make fluffy white clouds with it.

I started off by die cutting several clouds from Rubbernecker stamps. After that, I used On Point Glue to attach the Sparkle Blends to two of the clouds. Next, I used the sentiments from the Little Dragon stamp set from Lawn Fawn on the rest of the clouds. Then, I stamped out my dragon, cake, candle, and flame, colored them in and die cut them out.

I wanted a pull tab to reveal the flame, so I cut a slit in my blue paper and I attached my flame to a long strip of white paper using a foam square. I also used a pull tab die Lawn Fawn's Magic Color Slider Die.
After that, I attached foam squares to the clouds, my dragon, and my cake and attached them to the blue sky cardstock. I also attached the other clouds, but kept them flat.

Then I put foam tape on the back of my blue background and I inserted my slider into it. Finally I attached it to my card base. You can see that I only used whites and creams from the Pizza Party Sparkle Blend so that my clouds would look fluffy. I really like the large spiral sequins because it's a nice white and it adds cool texture.

I like that the flame can completely disappear behind the dragon and that the track isn't easy to see. The flame moves easily in the track and I really enjoyed making this card. Please visit the Sparkle Blend Shop on Etsy. Thanks for looking at my blog post today. Bye!

Saturday, July 11, 2020

Surprise Gift Shaker Card


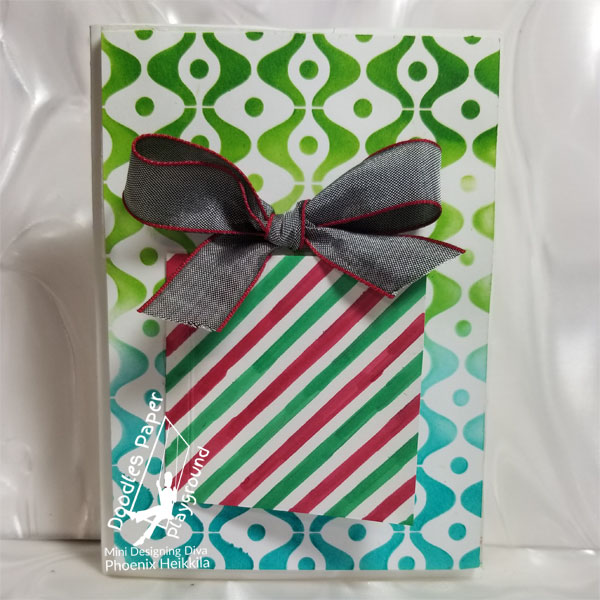
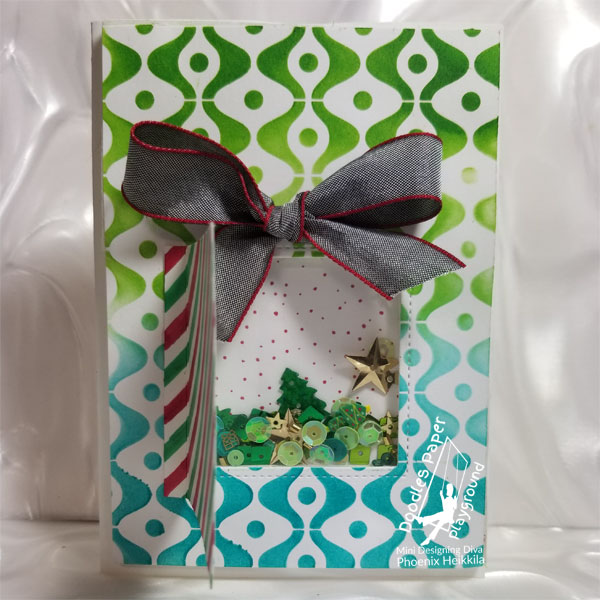
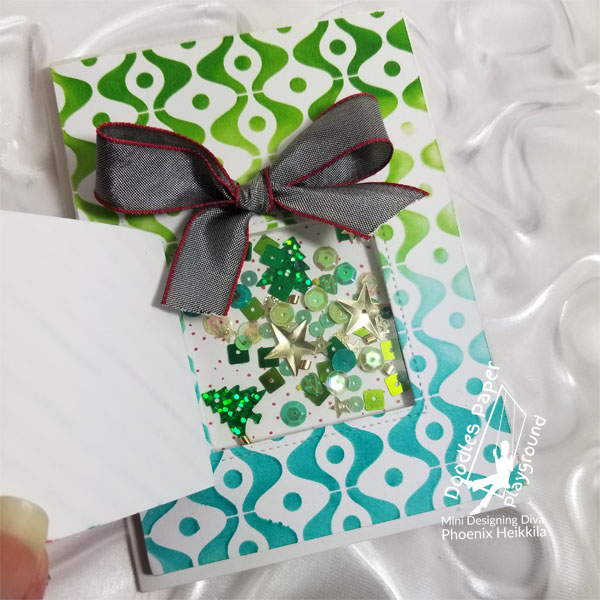
Hi, it's Phoenix. Today I am going to be showing you my Surprise Gift Shaker card using the "Oh Christmas Tree" Sparkle Blend from Doodles Paper Playground. I wanted to do something more interactive than just a shaker, so I decided to make the gift box "open" up.
This image has an empty alt attribute; its file name is Gift-Shaker-2-600-1.jpg
I started off by using Mowed Lawn and Peacock Feathers Distress ink on an old Dreamweaver stencil. I applied the ink with a Cotton Tail Blending Brush from The Rabbit Hole Designs. Next, I die cut a square on to the stenciled background. After that, I glued on a piece of acetate, using Zip Dry Glue. While it was drying, I decided that I wanted to use the "Oh Christmas Tree" Sparkle Blend, which helped me pick out everything else.
This image has an empty alt attribute; its file name is Gift-Shaker-4-600.jpg
I cut out a rectangle that was slightly bigger than my shaker window, and I used the Diagonal Stripe stencil from Simon Says Stamp on it with Copic Markers. The Copics stain the stencil, but I used Isopropyl Alcohol to clean it up. To make the flap on the side, I used a scoring tool 1/4" in from the left side. Then I attached it to the front of the card.
I added foam tape to the back, and filled the shaker window with the Sparkle Blend. I added a piece of paper that had some little red dots to close off the window. Next, I chose my ribbon, had Mom tie it into a bow, and I attached it with Zip Dry Glue. Then I added it all to the card base.
This image has an empty alt attribute; its file name is Gift-Shaker-3-600.jpg
I made this card much faster than I usually make cards, and I think it's really cool. I think that next time, I will add another piece of acetate on the inside, so that it becomes a see-through shaker. I hope you give this Surprise Shaker a try! Have a nice day!

Wednesday, June 17, 2020

Extraterrestrial Shaker

Hi, it's Phoenix. Today I'll be showing you my Extraterrestrial Shaker card that I made using one of the newest Sparkle Blends from Doodles Paper Playground, which is actually called "Extraterrestrial." I also used the Lawn Fawn stamp set called "Beam Me Up."
I started by stamping out my aliens and coloring them with Zig Clean Color Markers. For the alien in the space ship, I used Glow in the Dark Nuvo Drops on the transporter (on the bottom of the ship) and the circular lights along the front. I fussy cut the aliens next. After that, I cut out my landscape for the aliens and colored it in, also using the Zigs.
I really like the Extraterrestrial Sparkle Blend because it has little alien heads and glow in the dark clay pieces. It also contains several different kinds of patterned sequins that are very interesting. Here's how it looks in the dark.
Isn't it cool how all of those things glow?
Next, I cut pieces of foam tape and attached them to the landscape and inserted the Sparkle Blends. I glued my aliens on to the card, but I thought that it still needed a little bit more, so I used a star die from Rubbernecker Stamps for the top corner.

Making this card was a lot of fun because I am really interested in outer space. It looks really cool in the dark with all of the glow in the dark bits. Thanks for reading about my card. Have a good day!

Monday, February 10, 2020

Snow Cool

Hi, it's Phoenix! Today, I have my Snow Cool card for Doodles Paper Playground to show you. I used the Sparkle Blends Sweet Treats and Hey Chickie, because I thought that Sweet Treats would make a nice contrast on this card, and because Hey Chickie contains some larger sequins, in some of the same colors as Sweet Treats.
First, I stamped my penguin onto a white piece of paper. Then, I colored him in using Tombow Dual Brush Markers, and cut him out. After that, I cut out my card base and mat, and ran the mat through the die cutting machine. Then, I cut out a piece of acetate, and used double-sided tape to adhere it to the mat. Next, I stuck on foam tape.
After I applied the foam tape, I poured some Hey Chickie and Sweet Treats onto the oval of acetate. After that, I used the double sided tape again, to stick my penguin onto the card. Then, I stamped the snowflakes onto the card in blue, and stamped on the Let It Snow sentiment, also in blue. I really like the teeny FIMO pieces of food in Sweet Treats!
I thought that the front still need a little bit more, so I glued on some more sequins using On Point Glue. I decided that the front looked good, so I decided that my card was complete.

I am really happy with how this card came out! I especially like how my penguin turned out, and his multicolored hat! I was happy that the Sweet Treats worked well with the hat. I will be back on Friday with my blog hop project for Doodles Paper Playground. Thanks!

Monday, December 2, 2019

Stellar Human

Hi, it's Phoenix. I needed to make a "thank you" card for someone. I found the"Intergalactic" Sparkle Blend and I liked the colors a lot. My mom suggested the sentiment at the top (of the card) and I decided that it would work really well on the card.
I wanted a graphic looking card, so I used the "Hex Yeah" stamp and die set from CZ Designs and Simon Says Stamp. First, I die cut the hexagons in the gray cardstock and a sheet of craft foam (so that I didn't have to use foam tape). Next, I stamped the 3 black hexagons. Then I added my sentiment which is from Simple Sentiments No. 1.
I really like the diverse colors in the "Intergalactic" Sparkle Blend. I also like the different shapes. I especially like the fact that there are tiny hexagons in it. They go really well with my card.
Now I was ready to assemble the card. I used a white card base and built the shaker o top of that.
I think that the card turned out fabulously. The person who received it really liked it. You can take a look at all the Sparkle Blends at the White Rose Crafts store. Thanks for visiting!

Tuesday, October 22, 2019

Pawsome Pug


Hi, it's Phoenix. Today I am showing you my "Pawsome Pug" card. I was inspired by the new Pawsome Pets Sparkle Blend and the Bah Hum-Pug stamp set from Clearly Besotted. I really like the animal Fimo pieces in the Pawsome Pets Sparkle Blend. I also used some of the Citrine and Apple for Teacher Sparkle Blend.
First, I cut out the cream colored mat for the card. Then, I stamped the pug and colored and cut him out. I colored the pug with Tombow Dual Brush Markers. I knew before I started making the card that I wanted to have the sequins radiate out from the star on the pug, so I had to complete him first.
Next I attached the pug to the mat. After that, I started putting on sequins from the Pawsome Pets Sparkle Blend using On Point Glue. I started by putting on the yellows from Pawsome Pets and Citrine, and then worked my way out to the purples, then the blues. You can see a lot of the Fimo animal heads and paws in the picture above.
After I finished gluing on the sequins, I thought that the card needed more at the top, so I stamped on the sentiment from the Bah Hum-Pug stamp set and glued on a few more sequins in paw shapes around the sentiment. It took a long time to glue all the sequins on, but I really enjoyed making it.

Finally, I glued the mat on to the white card base. I'm really happy with how the colors radiate out from the pug. And, I like the variations of shapes and colors in the Sparkle Blends. You can check out all of the available Sparkle Blends at the White Rose Crafts shop. Thanks for looking at my post today. Have a great day!

Friday, September 27, 2019

Steampunk Window

Hi, it's Phoenix. Today I am here with my Steampunk Window card. I am really excited about this card that I thought up myself. I knew that I wanted to make something with the Grid Window cover die from Mama Elephant, so I decided to make a steampunk window. I really like gears and I thought it would look really good with a Sparkle Blend from Doodles Paper Playground.
I started off by die cutting a Reveal Wheel front (from Lawn Fawn) for under the Grid Window with gray cardstock. After that, I used a paper cutter to trim a hole in the front for the acetate that would expose the actual wheel that I was going to add underneath. Then I die cut the Reveal Wheel itself, and I embossed a Gears stencil from Dreamweaver (Stampendous) on it with a die cutting machine. I wanted to make the gears stand out so I applied some metallic rub-on pigment.
Next I glued on some watch parts that my mom had gotten from her dad a long time ago. I glued them on with On Point Glue. I then die cut the Grid Window and glued more watch parts on to it. Then I looked through all of our Sparkle Blends to see which one i wanted to use. There were a lot of good options like All That Glitters, Gingerbread Man, and Bells are Ringing, but I thought that Celebrate would look best with the steampunk theme.
The Celebrate Sparkle Blend is full of metallic colors so I thought that it would work out really well. I really like the coppery sequins in it. Once I had added the sequins, I decided to put it on to the Reveal Wheel window. I glued the window on to the card base, but I thought that it needed a little bit more, so I put more of the metallic rub-on pigment on the edge and glued on a few more sequins.
I am extremely satisfied with how it came out because I really like steampunk things and I think it's a cool way to use the Reveal Wheel. I think it's a lot of fun to come up with new ways to use paper crafting supplies. Thanks for visiting. Have a good day!

Monday, September 23, 2019

Multi Crystal Card

Hi, it's Phoenix. I made this card for Doodles Paper Playground using the Majestic Sparkle Blend. I was looking though my supplies, and I found the background paper with crystals that I used and it inspired me to make this card.
I started off by drawing and coloring the purple crystals. I free-hand drew them, and colored them with Memento Markers. Then I cut them out. After that, I assembled the shaker. I used and oval die from Elizabeth Crafts Designs, and filled the shaker with the Majestic Sparkle Blend. I chose that Blend because I thought the color would look good against the yellows, the blues, and the purples I had on the card so far.
After that, I glued on the trim with the crystals on it, but I thought t needed a little bit more, so I added the blue ribbon to it. I thought that it looked really good now, so I decided that it was complete.
I really like how the card turned out because I like how all the colors go together. I especially like the large pink glittery sequins in the Majestic Sparkle Blend. You can see all of the available Sparkle Blends over at White Rose Crafts. Thanks for reading. Have a nice day!

Sunday, August 11, 2019

Have a Veggie Happy Birthday

Hello, this is Phoenix, Alison's son. Today, I am showing you a card that I made using the new "Peridot" Sparkle Blend from Doodles Paper Playground. I made this card for my aunt, whose birthday is in August, and Peridot is her birthstone.
The stamp I used is from Sweet Stamp Shop. I picked it because my aunt likes kale a lot. I stamped it with VersaFine Clair ink in Nocturne on to cream cardstock. Then I colored in the stem with the Cottage Ivy Memento Marker from Imagine. Then I began the tedious work of gluing in the Peridot Sparkle Blend all over the kale.
To adhere all of the little bits, I used On Point Glue from Imagine. I like that glue because it's strong and dries quickly. I put glue on a small section, then put a bunch of sequins on, using the Jewel Picker Tool from Marvy. I'm really happy with how it came out. I like the variation of sizes in the Sparkle Blend.
Once I did the kale, I traced out the speech bubble design in pencil and then traced over it in a Faber Castell PITT pen. My dad came up with the sentiment! Next I wrote the sentiment with the Lilac Posies Memento Marker. After that, I stuck it to my card base. I thought the card needed something else, so I added blue ribbon to the corners.
I am very satisfied with the card. I think that my aunt will really love it. The "Peridot" Sparkle Blend, and all of the other Sparkle Blends from Doodles Paper Playground, can be purchased at the White Rose Crafts store. You can only get Sparkle Blends there. Thanks for visiting. Have a terrific day!